Market Bunches

Pictured: Burgundy carnations, red alstroemeria, and pink pepper berry with leather leaf and bronzed buttercup foliage.
Wow, we got dumped on. Even though the forecasters told us that it was coming, and we were somewhat ready, it’s always amazing to wake up to 8-10 inches of snow on the ground. Since your flower garden is now shivering under a blanket of snow, now is the perfect time to take advantage of cut flower specials in your local florist or market.
Buy a bunch of gorgeous seasonal flowers, some new and funky greenery and/or filler flowers and arrange them in a pretty vase. Here’s how:
Fill a vase with warm water. Add a packet of preservative that came with your bunch of flowers. Stir to dissolve.
Start with the greenery first. After you cut the stems, intertwine them so that they make a structure to stick the flowers into.
Cut at least one inch off of the stems of the flowers, preferably with a sharp knife, so that they will be able to drink the water more effectively.
Arrange the flowers as a one-sided arrangement or one that’s all around, depending upon where you will be placing your creation.
If you want to include filler flowers (small flowers like Baby’s Breath) insert stems in between the main flowers, being careful not to overpower your main arrangement.
Best Flowers and Berries for Fall

September is the best. Confused flowers think it’s still summer and bring us another round of abundant blooms on our roses and annuals. They smile up to the brilliant blue sky unaware of the snowy weather just around the corner. The nights are cooler, so the blooms last longer. Not only do we continue to smell the summer flowers, the fall flowers are just beginning to emerge.
Asters, after hanging around almost all summer teasing us, begin to pop in September. We already whacked them down a couple inches in July so that it would multiply the blooms on each stem. The periwinkle, hot pink, white, lavender and plum blossoms look like mini daisies and delight that corner of the garden.
Mums, the go-to florist flower since it’s so long-lasting, seems to take on a whole new function in the fall garden. It’s actually a welcome globe available in a myriad of colors: oranges-peaches, yellows-golds, pinks-burgundies, lavenders-plums, roses-rusts, blushes-whites. Pruning these in July as they emerge will also multiply the blooms.
After the roses take their final curtain call and drop their fading petals, they leave behind gorgeous rose hips. At first they are chartreuse, and then the cool nights burnish them with the startling persimmon orange and scarlet colors of autumn. If you use them in an arrangement, treat them as you would a rose stem. Cut them on an angle with a knife and quickly put them in water. They are equally beautiful on hot-glued to a wreath. They dry gracefully.
My favorite berry is bittersweet. My dad used to send me these branches. They grew on my dad’s property, and actually are parasites, albeit gorgeous ones. They grow best in acidic soil, so sadly I cannot grow them in Colorado. I have harvested them two ways. You can wait until the berries pop open when they reveal a red inner berry. Or, you can pick them when they are still light orange; they will pop later. They are beautiful made into a wreath or in various arrangements. Tuck sprigs of them into a bowl of gourds and mini pumpkins for your dining room table. Make a bittersweet garland for your mantle or for a sweet welcome above your front door.
Mountain Ash berries boast the same color as bittersweet orange before they pop. Or, as we call it in Colorado: Bronco Orange. They hang low in orange-size clusters, two or three to each three-foot branch.
Cotoneaster berries blaze with the spicy red of chiles. These berries climb up each stem, making the whole stem a red hot poker.
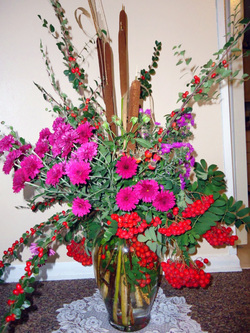
Here is an arrangement of most of the flowers and berries. mentioned above. It’s fun to bring the bounty to enjoy inside. Experiment with whatever grows in your garden. The result will fuel your soul.
Asters, after hanging around almost all summer teasing us, begin to pop in September. We already whacked them down a couple inches in July so that it would multiply the blooms on each stem. The periwinkle, hot pink, white, lavender and plum blossoms look like mini daisies and delight that corner of the garden.
Mums, the go-to florist flower since it’s so long-lasting, seems to take on a whole new function in the fall garden. It’s actually a welcome globe available in a myriad of colors: oranges-peaches, yellows-golds, pinks-burgundies, lavenders-plums, roses-rusts, blushes-whites. Pruning these in July as they emerge will also multiply the blooms.
After the roses take their final curtain call and drop their fading petals, they leave behind gorgeous rose hips. At first they are chartreuse, and then the cool nights burnish them with the startling persimmon orange and scarlet colors of autumn. If you use them in an arrangement, treat them as you would a rose stem. Cut them on an angle with a knife and quickly put them in water. They are equally beautiful on hot-glued to a wreath. They dry gracefully.
My favorite berry is bittersweet. My dad used to send me these branches. They grew on my dad’s property, and actually are parasites, albeit gorgeous ones. They grow best in acidic soil, so sadly I cannot grow them in Colorado. I have harvested them two ways. You can wait until the berries pop open when they reveal a red inner berry. Or, you can pick them when they are still light orange; they will pop later. They are beautiful made into a wreath or in various arrangements. Tuck sprigs of them into a bowl of gourds and mini pumpkins for your dining room table. Make a bittersweet garland for your mantle or for a sweet welcome above your front door.
Mountain Ash berries boast the same color as bittersweet orange before they pop. Or, as we call it in Colorado: Bronco Orange. They hang low in orange-size clusters, two or three to each three-foot branch.
Cotoneaster berries blaze with the spicy red of chiles. These berries climb up each stem, making the whole stem a red hot poker.
Here is an arrangement of most of the flowers and berries. mentioned above. It’s fun to bring the bounty to enjoy inside. Experiment with whatever grows in your garden. The result will fuel your soul.
Wreaths of Smiles

Every season I like to switch it up and change the floral décor in and around my house. Halloween looms like a ghouly ghost starting in August, so I haul out my “Fall” plastic storage tub to discover the treasures I tucked away after Thanksgiving last year. I’m always surprised by the cute decorations and leftover bits of leaves and flowers patiently waiting for me to rework. Usually I add to the collection, by venturing out to my usual haunts to check out the newest merchandise. Always keeping the budget in mind I like to spend the least amount of money for the most amount of dazzle.
For a few years I have grown the mini pumpkins that I so adore. I scatter a few of those on my mantle, outside next to larger pumpkins and gourds and my snack bar to make everyone who sees them smile.
If I have a good season, I cut errant grapevines and wind them into submission creating beautiful wreaths. Depending upon my mood, I augment them with a various array of fall leaves, cat tails, pine cones, nuts, berries and flowers. Below is the process.
How to Make a Grapevine Wreath
Choose vines that are 4-5 feet in length. Three feet is OK, but you’ll need to start with longer ones to form the first circle. If they are still green, they will be easier to wind. You will need about 20-30 vines, depending upon how thick you want your wreath.
Reserve at least three long vines.
If they have not dropped their leaves (or grapes!), remove them. If you have unblemished grape leaves, you can preserve them in jars and use them for stuffed grape leaves (dolma) recipes. Look for a recipe in the Food section.
Determine how large the wreath will be and loop the vine into a circle, winding the excess around and around the main circle to hold it in place. Take the next long vine and wind it in the same direction around the first circle, starting at about two inches from where the first circle was started. Repeat until you have wound about ten vines around the first circle.
**I usually like a fairly thick wreath and I‘ve found that at this point I make another wreath about the same size or slightly smaller than the first.
Then I set the second wreath on top of the first wreath. Using the reserved long vine, I wind that around both wreaths, and repeat with one more long vine, making sure that both wreaths are tightly secured together. If I want it thicker, I repeat the process until I achieve the desired size.
If I have used green vines, I set the wreath out to dry in the sun. Once it’s dried, if I need to, I adjust the vines, making sure they are tight and secure.


Then I decorate it. I have used these wreaths for all seasons. My daughter wanted a fall wreath to hang on the front door of her new house. Here is a photo of it after I gave it to her:
~Once you have the technique mastered, you can use almost any twig or vine to make a lovely wreath.
~Once you have the technique mastered, you can use almost any twig or vine to make a lovely wreath.

Made with red twig dogwood

Made with birch
*If you cut birch branches, make sure you use a dab of Elmer’s glue on the end of each cut. That way the borers won’t burrow into the wood and kill your tree.

Made with silver maple

Made with aspen
Have fun making these artistic accents. Who knows? Your friends just might commission some from you.
Workplace Stress Releasers
In a time when we see outsourcing and the push for more productivity there are a few things we can do to make the workplace less like a machine and more like a garden.
- Cut some blooms from your own garden; arrange them in a vase and set them on your desk, or better yet, a coworker’s desk.

Pictured: lavender and pink swirled rose, raspberry clematis vine, blue delphinium, pink and fuscia geranium, fuscia petunia, lavender sprigs and a spider plant cutting.
2. Bring in a green plant that thrives in low light, and
set it on your desk. Here are some choices:
set it on your desk. Here are some choices:

Spider Plant

Peace Lily (Spathyphyllum)

Snake Plant (Mother-in-law's tongue)

Dracena

Devil's Ivy (Pothos)

Chinese Evergreen

Philodendron
.

3. If you love those cute little flowering plants you see in the florist shop, greenhouse or grocery store, go ahead and pick one up. They will brighten any space.
Note: Don’t expect these to live past a couple weeks. They should be viewed the same way as cut flowers. Also, they don’t transplant very well, since they have been “forced” to flower in a greenhouse.
Note: Don’t expect these to live past a couple weeks. They should be viewed the same way as cut flowers. Also, they don’t transplant very well, since they have been “forced” to flower in a greenhouse.
8 Tips for Picking Flowers for Your Spouse

1. Find out the flower of your anniversary month. Order a bouquet from a florist or find a potted plant at a local nursery.
2. What is your spouse’s favorite flower or shrub? Find it in his or her favorite color if possible and display the surprise.
3. Arrange a dozen in a vase or put a “this comes with installation” card attached to the shrub.
4. Often flowers from the grocery store don’t come with greenery and they look a little naked in a vase. Try clipping greenery from your garden, peony leaves, ferns, iris stalks, ivy, or hydrangea leaves to tuck in the vase with your flowers. “Filler” flowers grow well, too, in a garden. Try using baby’s breath, sweet William, coral bells, monte casino, statice, misty blue, forsythia and pussy willows.
5. An orchid plant is an elegant pleasure.
6. A bouquet of orchids will be stunning and will be long-lasting.
7. Remember what s/he said last year when remarking upon how gorgeous lilacs, roses, hydrangeas, camellias, jasmine, in the neighborhood were. Plant one in your own yard so that s/he can always have one to admire.
8. If s/he doesn’t have a favorite, visit your favorite florist and choose several that you think s/he’d like. Have the florist arrange them and then deliver them to the workplace, home or just bring them home with you, so that you can see the special gasp the surprise brings.