Ginger Crinkles

It’s the season for the intoxicating scent of homemade cookies, working its magic like a magnet luring you into the kitchen. But be warned; if you make these cookies, they can be addicting.
2 cups four
¾ cup shortening
¼ teaspoon salt
1 cup light brown sugar
3 teaspoons baking soda
1 egg, slightly beaten
1 teaspoon cinnamon
¼ cup light molasses
2 teaspoons ginger
¼ cup granulated sugar
Sift flour, salt, soda, cinnamon, and ginger together. Set aside. Cream shortening. Gradually add brown sugar and cream thoroughly. Add beaten egg and molasses. Blend well. Add sifted dry ingredients. Stir until just moistened. Shape into balls about one inch in diameter. Dip tops into granulated sugar. Place sugar side up on a greased baking sheet. Bake in a preheated 350° oven for 10-11 minutes. Remove from baking sheet to cooling rack.
~Oh my gosh, these are the best ginger cookies I have ever tasted, and I’ve tried quite a few! I rediscovered this recipe from my mom’s recipe file. She saved the recipe I had copied onto a card from the cookies I made in 7th grade Home-Ec class. And to think that we thought Jr. High was some place we never wanted to revisit. We were wrong...
Too Many Cherry Tomatoes?

You can’t wait. Once that first cherry tomato blushes almost ripe, you grab it and pop it into your mouth, celebrating your harvest. However, by September the early glow of first fruits has passed and you wonder: What am I going to do with all these cherry tomatoes? Luckily, I found and modified a recipe that should appeal to almost any palate. Try it and tweak it to your tastes.
Cherry Tomato-Red Bell Pepper Crisp
1½ cup cherry tomatoes
1 red bell pepper, cored, peeled and cut into 1 inch pieces
2 slices bread
1-2x2x2 inch piece or ¼ cup shredded Parmesan cheese
3 sprigs parsley
one green onion cut into thirds
one clove garlic, peeled (optional)
½ teaspoon salt
¼ teaspoon pepper
drizzle of olive oil (1-2 tablespoons)
Preheat oven to 400º.
Spray a 9 inch casserole dish or glass pie pan with vegetable spray. Layer the bottom with one cup tomatoes and the bell pepper pieces, reserving a few cherry tomatoes for the top.
Put the bread, Parmesan cheese, parsley, green onion, salt, pepper (and garlic, if desired) in a food processor. Pulse until the bread and the Parmesan cheese are crumbled. Pour over the cherry tomatoes and bell pepper pieces. Arrange reserved cherry tomatoes on top. Drizzle with olive oil. Bake for 25 minutes.
Experiment with other vegetables such as carrots, onions, mushrooms or green beans.
~The crunch of the peppers and the sweetness of the tomatoes blanketed by the crispy topping just explodes into a flavor festivity. Who knew that a traditional dessert could be translated into a lovely vegetable side dish?
Best Margarita

6 oz really good frozen limeade concentrate
3-4 ounces tequila (your favorite)
1-2 oz Triple Sec
2 cups frozen strawberries
2-4 tablespoons superfine sugar, optional
One lime
2 tablespoons sugar
Ice
Pour all ingredients (except ice and lime) in a blender and fill to the top with ice. Blend on high.
Meanwhile, spread sugar on a small plate. Rim margarita glasses with a cut lime and dip into sugar.
Pour frozen mixture into glasses and garnish with a slice of lime or strawberry if desired.
~My friend Cindy gave me this recipe. Those Texans sure know their tequila drinks! This is absolutely the best margarita I’ve ever tasted!
Are You Ready for Some Nachos?
Wait, isn’t it supposed to be football? For some of us, it is football. We wait all spring and summer, moping about no football, and then all of a sudden there is more football on TV than you can throw a foam brick at. We’re in heaven.
For others, it’s all about the snacks and drinks. Since we’re still technically in the midst of corn season, the following recipe should excite all of your senses. You can make one recipe and stick somewhat to your diet, but, I’m warning you; you’ll want more. You may also want to indulge in the best margarita I’ve ever tried to wash down the spicy chips. Have fun!
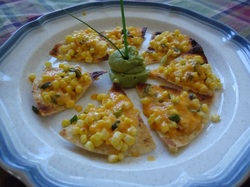
Grilled Corn and Cheddar Nachos
2 ears of corn, husks peeled back and silk removed
1 jalapeno pepper
1 scallion, thinly sliced
½ teaspoon cumin
1 tablespoon fresh lime juice
Dash of salt and pepper
4 ounces cheddar cheese, grated (1 ¾ cups)
24 tortilla chips (I use white corn chips.)
For others, it’s all about the snacks and drinks. Since we’re still technically in the midst of corn season, the following recipe should excite all of your senses. You can make one recipe and stick somewhat to your diet, but, I’m warning you; you’ll want more. You may also want to indulge in the best margarita I’ve ever tried to wash down the spicy chips. Have fun!
Grilled Corn and Cheddar Nachos
2 ears of corn, husks peeled back and silk removed
1 jalapeno pepper
1 scallion, thinly sliced
½ teaspoon cumin
1 tablespoon fresh lime juice
Dash of salt and pepper
4 ounces cheddar cheese, grated (1 ¾ cups)
24 tortilla chips (I use white corn chips.)
- Preheat grill to medium high heat. (I just plug in my table top electric grill.)
- Preheat broiler.
- Reposition husks back over corn and place on grill. Place jalapeno pepper on grill as well. Grill turning occasionally about ten minutes. Let cool slightly.
- Cut kernels off cobs and transfer to a medium sized bowl. Split jalapeno in half and seed, making sure to remove the membranes. (Don’t touch your eyes!) Finely dice. Add to corn.
- Add scallion, cumin, lime juice and cheese to corn mixture. Toss until well combined.
- Arrange chips on a baking sheet. Top each chip with about one tablespoon of corn mixture. Broil until cheese is bubbly, about 30 seconds. Serve immediately.
Preserved Grape Leaves

Unblemished grape leaves, free of pesticides and washed
Water
Pickling Salt
Citric or Ascorbic Acid
Quart or pint Mason jars
Rings and new lids
Canning Tongs
Kitchen tongs
Canning pot
Large, medium and small saucepan
Large bowl
2 cups of ice cubes
Ø Count the number of grape leaves you wish to preserve. I used quart jars because my grape leaves were large and I didn’t want to press them down into a small pint jar. I put 24 grape leaves in one jar.
Ø Put as many clean jars as you will need into canning pot and cover with water. Turn on high heat and bring to a boil. Fill another large pot half way with water and bring that to a boil. Fill a small saucepan half way with and bring to a boil.
Ø Prepare the brine by boiling ¼ cup pickling salt with every 4 cups of water you use in a medium saucepan. Add 2 ½ to 3 teaspoons citric or ascorbic acid powder for every 4 cups of the brine.
Ø Put the lids in the small saucepan of boiling water and turn down to low.
Ø When the water in the large canning pot is boiling, turn the heat down to medium.
Ø Add cold water and ice cubes to the large bowl.
Ø With kitchen tongs submerge the grape leaves into the boiling water in the large saucepan for 30-45 seconds. Fish them out and immediately plunge into the bowl with the ice water.
Ø Stack six grape leaves on top of each other and roll up tightly. Repeat with all of the grape leaves.
Ø With canning tongs lift a hot jar out of the canning pot, making sure to spill out a little of the boiling water into the pot to prevent burns. Empty out in the sink or another heat-proof container.
Ø Pack as many rolled up stacks of grape leaves as can fit into a jar
(4-6). Fill with boiling brine solution, leaving ¼ inch headspace. Wipe off rim of jar. Place hot lid on top and screw on ring tightly. Process in boiling water for 30 minutes.
Ø Lift jars out with canning tongs and place on a heat-proof counter or pad for 24 hours. Make sure the lids “pop” indicating that the jar is sealed.


Grape Jelly

4 cups grapes, stems removed
Jelly bag, cheesecloth or coffee filter
¼ cup water
7 cups sugar
1 package pectin (like Sure-Jell)
½ teaspoon butter
8 ounce, 12 ounce, or pint canning jars
New lids and rings (Used rings can be used if they are clean.)
Canning pot
Canning tongs
Made with Niagara Grapes
Wash grapes thoroughly. Put grapes and water in a large pot. Heat to a boil and simmer for 15 minutes. DO NOT CRUSH, because crushing will result in a cloudy jelly. Line a large colander with cheesecloth or filter or use a jelly stand. Put the colander over a large pot. Pour grapes and resulting juice into colander. Let stand overnight. Resist the temptation to crush! Place jars in canning pot and fill with water to cover them about 1-2 inches. Bring to a boil. Fill a small saucepan with water and bring to a boil. Measure 5 cups of grape juice into a large pot. Stir in pectin. Add ½ teaspoon butter to reduce the amount of foam. (This really works!) Bring mixture to a boil. Immediately stir in sugar all at once. Bring to a full rolling boil, (one that won’t be stirred down), stirring constantly with a wooden or silicone long handled spoon or spatula. Boil and stir for one minute. Turn off heat. Skim off any residual foam. (There won’t be nearly as much foam if you add the butter.) Dip the lids into boiling water that is in the small saucepan before placing on mason jars. Lift jars, one at a time, out of the canning pot, spilling a little into the pot before discarding the rest in the sink or another heat proof container. Ladle fruit juice immediately into jars, leaving ¼ inch headspace. Wipe off rims before screwing the hot lids on. Using the canning tongs, return the jars back into the canning pot and boil for 5 minutes. Add 2 minutes for each 1000 feet above sea level. Since I live at about 5,000 feet, I process them for 15 minutes. Lift the jars out onto a heat-proof counter or heat pad and listen for the tell-tale “pop” indicating that the lids are sealed. After lids “pop”, leave them in place for 24 hours. (You can check to see if they are sealed by pressing lightly on the top. If it doesn’t give, it is sealed.)
Makes about 8 cups.
~ My neighbor, Mrs. Maxey was the one who advised me not to crush the grapes. As a result, my jelly looks like a jewel.
Dolmades (Stuffed Grape Leaves)

12 grape leaves, washed and blanched, or preserved
½ cup rice, cooked
½ pound ground beef
½ onion, diced
¼ red bell pepper, cut into small dice
4 oz. fresh mushrooms, chopped
2 tablespoons fresh basil, julienned
½ teaspoon red pepper flakes
Splash of wine (your favorite)
4 beef bouillon cubes
Salt and pepper
Sauté ground beef onion, bell pepper and mushrooms in a large skillet for about 5 minutes or until beef is cooked and vegetables are tender. Drain. Stir in two bouillon cubes, rice and a splash of wine. Cook uncovered, stirring occasionally until the bouillon cubes are dissolved and the wine is incorporated, about five more minutes. The mixture should not be runny.
In another skillet pour two cups of water and the remaining two bouillon cubes. Bring to a boil. Once it boils, turn the heat down to a simmer.
Lay out grape leaves on a plate. Viewing the leaf as a hand, spoon 1-2 tablespoons of the rice mixture sideways onto the spot where the thumb would be (if the leaf were a hand J). Then roll up, burrito style, tucking in the edges so that the ends are enclosed. Repeat, using all the rice mixture.
Lay the grape leaf rolls side-by-side in the simmering beef broth. Simmer, covered, for 45 minutes-one hour, or until the broth has evaporated.
Serves 4-6 per person.
~Several recipes for dolmades include mint leaves in the recipe, but since I prefer basil, I decided to try it. Then I switched it up and added my favorite mushrooms and the bite of red pepper flakes. Non-traditional, to be sure, but I’ve always been somewhat of a rebel. Tzatziki, the famous Mediterranean cucumber/yogurt sauce as well as a tomato sauce is often featured as a topping for dolmades. However, this delicious recipe doesn’t need any augmentation.

Peach Peel and Pit Jelly
Peels and pits from about 22 pounds of peaches
1 teaspoon vanilla, or 1 tablespoon fresh lemon juice, optional
1 box of pectin
Clean Mason jars
lids and rings (lids can only be used once)
Large canning pot
Canning tongs
1 teaspoon vanilla, or 1 tablespoon fresh lemon juice, optional
1 box of pectin
Clean Mason jars
lids and rings (lids can only be used once)
Large canning pot
Canning tongs

Save peels and pits from peaches while processing peaches for canning. Refrigerate until you have the peels and pits from a lug (about 22 lbs.) of peaches. Place in a heavy saucepan. Cover with 3 ¼ cups of water and bring to a boil. Turn down the heat and simmer for 30 minutes. Turn off the heat, cover, and let stand overnight.
Put canning pot full of mason jars and water to cover them by 2 inches on stove. Cover the pot and bring it to a boil.
Meanwhile, strain juice through a cheese cloth (obtained at any store that has a fabric department or canning supplies) lined in a colander or sieve. I have also used a coffee filter. Measure three cups of juice into a large saucepan. Add one package of powdered pectin. Bring to a vigorous boil (one that cannot be stirred down). Immediately stir in 3 cups of sugar. Bring back up to a full rolling boil and boil exactly one minute, while you stir it constantly. Remove from heat and stir in vanilla if desired. (Vanilla will give it a smooth, mellow flavor.) Or, you can stir in lemon juice at this point. This will brighten up the flavor, giving it a little zing. Skim off any foam that may have accumulated.
With canning tongs carefully lift a jar out of the pot, spilling a little of the water out, to avoid burning yourself while you pour the rest of the water out into a sink. Using a ladle, quickly fill hot mason jars with the peach jelly within 1/8th inch of top of jars. Wipe the rims and threads of the jars. Put a hot lid on each jar. Screw the ring on tightly. Place jars back into the canning pot of boiling water and make sure the water covers them by 1-2 inches. Bring the water back to a boil and boil for 10 minutes. Add 2 minutes for each 1000 feet above 1000 feet. (Remember, Denver is a mile high-5280 feet.)
Using the tongs, lift the jars out of the pot, setting them on a rack or a towel to cool completely. Leave them there for 24 hours. Within a few minutes you will hear a “pop”, indicating that the jar is properly sealed. The lid will have depressed slightly in the middle. Make sure that all of the jars are sealed. (To check them, just press the tops and see if they give.) If they don’t seal after 24 hours, you need to refrigerate them immediately, or take the lids off, wipe the rims, use new lids and reprocess.
Yield: About five 8-ounce jars of gorgeous jelly
~My sweet girlfriend Cheryl gave me this recipe after she thought that it was a shame to “waste” all of the flavor from the peach peels. She researched and found this recipe that many of our friends have enjoyed. Recycling at its most deliciousness!
Farmer's Market Delight
Every year my little dog and I look forward to the opening of the farmer’s markets. The farmer’s market is just an added bonus to his weekly downtown stroll. The sensory delights explode as we navigate around the big dogs and the tempting booths. Patiently he endures the tiny hands that want to pet him, and shows off his skills when he waves good-bye to all of his admirers.
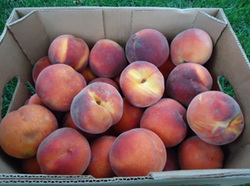
I love to support local farmers, and I shop for the most enticing produce each week. This week I was on the hunt for my annual box of Pallisade Peaches. I have found that I prefer peaches grown locally because they ripen beautifully, even if I buy them when they are rock hard. I just leave them in the cardboard box, put them into a brown paper bag, or into a deep bowl on the counter and voila, within a few days I have sweet, mouth-watering Colorado gold.
Usually, there are several booths selling peaches. How are we to know which peach to choose? When I began my quest, I harkened back into my childhood when I helped my mom can peaches. I remembered that I needed a peach that was free-stone (so I would’nt have to wrestle with it) and that she used either Elberta or Hale Haven. Not seeing any of those varieties, I spoke to the vendor and asked him whether he would have either one of those in the next few weeks. Or, if the ones he was selling that day were similar. He said that the Suncrest peaches he was offering had superior flavor, but perhaps did not “slip” as easily as other varieties.
What does that mean? When canning peaches, you need to slip the skin off of the peach. In order to do that, you will need to submerge the whole peach into boiling water for thirty seconds and then immediately plunge it into ice cold water. The skin should slip right off.
As he lifted the lid off of the box of peaches, I knew I was hooked. The scarlet orbs warmed the inside of the box, mesmerizing me. The challenge presented concerning slipping the skin off of these gorgeous peaches would just have to be conquered.
Flushed with pleasure, I proudly hefted my 22 lb. box of amazing Colorado peaches and my sweet puppy and I floated back to the car, dreaming of the glistening jars of peaches I would preserve in a week. (Well, my puppy was probably dreaming of that cute Cock-a-poo he met.)
Next week here is the recipe I will use to can my beautiful peaches:
How To Can Peaches

Large canning pot
Large saucepan
2 small sauce pans
Quart or pint canning jars
2 piece lids and rings
Canning tongs
Wet dish cloth
Plastic knife
Wire rack (or dry dish cloth)
Free-stone peaches
Ascorbic acid produce protector (like Fruit Fresh)
Sugar
Count how many peaches you plan to can. You’ll need 5-6 peaches for each quart you can. Make sure your jars are clean. Place them into a large canning pot and cover them with water. Set the covered pot on a stove burner and bring the water to a boil.
Meanwhile measure out equal parts of water and sugar into a large saucepan.
(I usually start with 3 cups of water and 3 cups of sugar.) Add one teaspoon ascorbic acid for each cup of liquid. Bring to a boil.
Fill a small saucepan three-quarters of the way full with water and bring it to a boil. Fill a kitchen sink or a large pot with enough ice water to cover a peach. Sprinkle in ascorbic acid according to the directions on the bottle.
Put the lids into another small saucepan. Cover with water and bring to a boil. When it boils, cover the pan and turn the burner off.
When the water in the small saucepan without the lids comes to a boil, submerge a peach or two in the water for thirty seconds. With a slotted spoon, dip them out and plunge them immediately into the ice-cold water. You should be able to slip the skins right off of the peaches. (If you want to, reserve the skins for another delicious recipe: Peach Peel Jelly.) Put the peaches back into the ice-cold water until you have at least six peaches and the water in the canning pot is boiling.
When the water in the canning pot is boiling, turn the burner off. With canning tongs carefully lift a jar out of the pot, spilling a little of the water out, to avoid burning yourself while you pour the rest of the water out into a sink. Replace the lid. Set the jar into a ceramic bowl. Slice or halve the peaches into the jar, packing tightly. Cover completely with the sugar water. Slide a plastic knife down the side of the jar to extract any air bubbles. Add sugar water to within ¼ inch from the top, if needed, (to create head space). Wipe the rim and threads of the jar clean, removing any sugar syrup.
Carefully take a lid out of the hot water and place it on top of the jar. Screw the ring on tightly. Repeat for all the peaches. Using the canning tongs, place the jars back into the canning pot, making sure that the water covers them. Bring the water back to a boil and boil for 10 minutes. Add 2 minutes for each 1000 feet above 1000 feet. (Remember, Denver is a mile high-5280.)
When the time is up, carefully extract your jars and put them on a rack or a dry towel on your counter. Leave them there for 24 hours. Within a few minutes you will hear a “pop”, indicating that the jar is properly sealed. The lid will have depressed slightly in the middle. Make sure that all of the jars are sealed. (To check them, just press the tops and see if they give.) If you have one that did not seal after 24 hours, you can just put it into the refrigerator and enjoy that jar of peaches right away. If none of them have sealed, you will need to unscrew the rings, throw all of the lids away, and use new lids to process them again. Make sure that the tops of the jars are wiped clean.
~I usually store my canned peaches in boxes in the basement. In the dead of winter I’ll suddenly remember my luscious summer, just waiting to chase away my winter blues.

Food Series: Workplace Delights

Bringing something to the workplace to brighten co-workers’ eyes can be easy. I have gained quite a favorable reputation for my “attitude adjustment” recipes. Here are a couple samples:
Amazing Artichoke Dip
- 1 cup thawed and drained chopped spinach
- 1-8 oz. package cream cheese, softened
- 1- 13.75 oz. can artichoke hearts
- ¼ cup sour cream
- ¼ cup homemade mayonnaise (recipe follows), (or store bought mayonnaise)
- 1/3 cup Parmesan cheese (or more for topping)
- ½ teaspoon red pepper flakes
- ¼ teaspoon salt
- ¼ teaspoon garlic powder
Preheat oven to 350º.
Drain artichokes and cut quartered hearts in half. Squeeze the liquid out of the drained spinach. In a large bowl thoroughly mix cream cheese, sour cream, mayonnaise, Parmesan cheese, red pepper, salt and garlic powder. Gently fold in spinach and artichoke hearts. Place in a casserole dish that has been sprayed with non stick cooking spray. Sprinkle with more Parmesan cheese if desired. Bake for 35 minutes. Serve with baguette slices, crackers or assorted vegetables.
Homemade Mayonnaise
- 1 large egg **
- 1 tablespoon fresh lemon juice
- ¼ teaspoon dry mustard
- ¼ teaspoon salt
- ½ teaspoon sugar
- dash cayenne pepper
- dash onion powder
- dash garlic powder
- ¾ cup vegetable oil
**If you are concerned about a raw egg in the mayonnaise, poach the egg for two o three minutes before blending.
~After searching and tasting, I finally developed the perfect artichoke dip!
Poppy Seed Cake
- 1 yellow or white cake mix, plus ¼ c. flour
- ½ cup unsweetened pineapple juice
- ¾ cup water
- 1 package vanilla instant pudding mix
- ½ cup vegetable oil
- 4 large eggs
- 1 teaspoon almond flavoring
- ¼ cup poppy seeds
Preheat oven to 375 degrees for aluminum Bundt pans and 325 degrees for cast iron Bundt pans. Mix all of the above but the poppy seeds and beat hard with an electric mixer for 5 minutes. Add poppy seeds and beat for one minute. Grease and flour Bundt pan. (I use Baker’s Joy spray.) Pour batter into the Bundt pan and bake for 40 minutes. Let stand ten minutes before removing. When cool, drizzle creamy glaze over top.
~My friend Jacki shares the best recipes! I added the glaze for even more richness-big surprise, I know… Everyone loves this cake!

Velvety Glaze
1/3 cup butter
2 cups powdered sugar
1 ½ teaspoon almond flavoring
2-4 tablespoons hot pineapple juice
optional: ¼ cup sliced almonds
Heat butter in a medium sized saucepan until melted. Stir in powdered sugar and flavoring. Stir in pineapple juice, one tablespoon at a time, until glaze is of desired consistency. Stir in almonds. Drizzle over Bundt cake.
Addictive Chocolate Chip Cookies

2 cups flour
1 cup shortening (e.g., Crisco)
1 cup brown sugar, packed
2 eggs
2/3 cup white granulated sugar
1 teaspoon vanilla extract
1 teaspoon salt
1 teaspoon baking soda
2 tablespoons hot water
6 ounces chocolate chips
1 cup shortening (e.g., Crisco)
1 cup brown sugar, packed
2 eggs
2/3 cup white granulated sugar
1 teaspoon vanilla extract
1 teaspoon salt
1 teaspoon baking soda
2 tablespoons hot water
6 ounces chocolate chips
- Preheat oven to 350°.
- Mix first four dry ingredients thoroughly.
- Mix shortening, eggs, and vanilla extract into dry mixture.
- Combine baking soda and hot water and mix into dough until completely incorporated.
- Stir in chocolate chips.
- Drop by teaspoons or tablespoons depending upon your cookie size preference onto cookie sheet.
- Bake at 350° for 10-13 minutes, depending upon the size of cookie and the tendency of your oven.
Working with Basil

One of the most favorite herbs lately is basil. I love its lemony, peppery fragrance, but I have had trouble growing it in the past. When I tried to grow it in an herb garden pot on my kitchen counter, the parsley would thrive, but the basil would soon shrivel, turn black and die. Next I tried in my friend’s gorgeous garden. Her soil was rich and black, but, again, the basil seemed to struggle. Then I reasoned that perhaps our climate with its cool evenings made the basil shiver. So, the next year, I tried planting a four inch plant, right in that same beautiful soil, but this time I surrounded it with a Wall of Water. A Wall of Water is a cylinder of plastic that has reservoirs that you fill with water. Once they are full of water, the cylinder stands up on its own, protecting the plant. It acts as a greenhouse, keeping the plant warm, and allowing sunlight in, creating a Mediterranean lifestyle the basil is used to. Success! I had basil to adorn several dishes all season. And I dried some to use in the winter.
Drying basil
I have tried several methods, but this one seems to be the easiest and holds the color the best.
Lay the leaves of basil in a single layer on a microwaveable dinner plate. Microwave on high for one minute. Remove from microwave and let cool. Crumble into a spice jar.